They grow up so fast...
By this point in time, our ball is full of little pockets of carbon dioxide and is smelling very much like bread. It looks wonderful, sitting in that bowl all plump and doughy... and now we're going to punch it. That's right, punch it down right in the middle of the ball. What we're doing here is known as "degassing", or releasing the excess CO2 that has built up as the yeast has been busy with further fermentation. Here is another step in which artistry comes into play-- depending on the intended result, we may need to de-gas to a greater or lesser extent. For lighter breads with an airy, open crumb, we would like to retain a good number of gas pockets in the dough, as they'll expand during baking to give us our desired consistency. For denser breads (such as bagels and pumpernickel) we're going to want to work the dough a bit more to collapse more of the pockets before baking.
Punch it!
For my sourdough, I shoot for the middle of the road, degassing the dough with an initial punch-down, turning the ball out onto a floured surface and then retaining the remaining gasses by employing a method known as folding the dough. Folding works much like it sounds, you continually fold the dough over, pull and stretch it out, and fold again. Try not to overwork the dough... even for dense breads we still want some of the gas to stay behind.
Stretch...
...and fold.
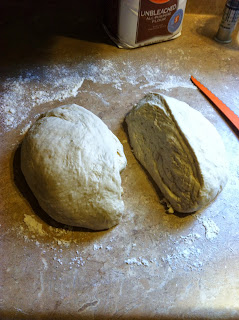
Once we've worked the dough for a minute or three (you'll develop a "feel" for the dough that will help determine when it's "ready"), shape it into a ball and divide it in half. Some bakers employ a kitchen scale for measuring ingredients and portioning dough, but I like to keep things simple and do it by eye. This generally results in one of the two loaves being a bit larger than the other, but that's perfectly okay.
Separated at birth.
While I do enjoy shaping loaves by hand for a more "rustic" bread, for the sake of predictable outcomes I'll be using my trusty loaf pans. Even though the pan will help dictate the shape of the loaf, there's still a bit of work to do before anything goes into the oven. Take the portioned dough, one piece at a time and start working the ball into a cylindrical shape, roughly as long and wide as the bottom of our loaf pans. With our hands palm-up, make a motion similar to if you were scooping water up into your hands, stretching the dough from about the mid-point of the cylinder and tucking it under the bottom (see picture below).
If I weren't holding the camera, there'd be another hand on the other side
of that ball, trying to show you what it is I'm talking about.
What we're looking for here is surface tension, and why good gluten development is so vital. Dry or underworked doughs will tend to tear as opposed to stretching, and we need it to stretch. Continue with the motion described above until the top of your loaf is stretched smooth and the dough feels "tight". This tightness promotes a crust that is chewy without being crumbly, which for my taste is perfect for this sourdough.
Grease the loaf pans and place the dough centered in the bottom of each one. Lightly drape a kitchen towel over the pans and let them sit at room temperature for about an hour, or until they've once again doubled in size. This final rise is known as "proofing" the dough, or the final rest period before baking. It is possible and sometimes desirable to retard the proofing process by refrigerating the dough at this point. The low temperatures will slow the reproduction of the yeast and facilitate the further growth of lactobacilli, lending a more pronounced sour flavor to the dough. In this case, we will proof the loaves at room temperature as we should have developed quite a bit of flavor just by aging the starter before we began. If you find you'd prefer more sour in your sourdough, feel free to experiment with retarding the proof, and as always... enjoy the results!
Ready for the final rise (proof).
We're now ready to move on to last bit of kitchen wizardry and bake some bread!
Next:
Part Six - The Bake
Previous:
Part Four - The Rise


No comments:
Post a Comment